Step 1: Verify You Meet the Owner-Builder Requirements
Before touching a permit application, confirm that you meet your state and local jurisdiction's owner-builder eligibility criteria. While these vary by state, the common requirements are:
- You own the property. Your name must be on the deed or title. Renters cannot pull owner-builder permits under any circumstances.
- You occupy or intend to occupy the home. Most states require the property to be your primary residence — not a rental, investment property, or vacation home.
- The property is a single-family residence. Owner-builder exemptions almost never apply to multi-family properties (duplexes, triplexes, apartment buildings).
- You will perform the work yourself. You cannot hire unlicensed workers to do the work under your owner-builder permit. Helpers or family members are typically allowed, but they must work under your direct supervision and cannot be paid.
California adds an additional requirement: you must have owned the property for at least 12 consecutive months. Texas exempts owner-occupants at the state level but many cities override this. Use our permit wizard to get a state-specific answer quickly.
Step 2: Find Your Local Building Department
Electrical permits for residential work are issued by your local jurisdiction — the city if you're within city limits, or the county if you're in an unincorporated area. Here's how to find the right office:
- Search "[your city] building department electrical permit" — this usually surfaces the official portal directly.
- Alternatively, visit your county's official website and look for a "Permits" or "Building and Development Services" section.
- If you're unsure whether you're inside city limits, check your county's GIS mapping tool or your property tax statement — it will indicate the municipality (or "unincorporated").
Note the difference between the building department (issues the permit) and the utility company (handles the disconnect and reconnect). You'll need to contact both, but they're separate processes.
Step 3: Gather Your Documentation Before Applying
Nothing slows down a permit application more than having to gather documents after you've started. Collect these before you open the portal:
- Property address and parcel number (APN or PIN). Find your APN on your county assessor's website or your property tax bill. It's typically required on the application.
- Description of work. Write a clear, specific description: "Replacement of existing 100A residential service panel with new 200A panel. No changes to existing circuits." Keep it factual — vague descriptions get flagged for follow-up.
- Panel manufacturer and model number (if already selected). Not always required at application, but having it ready speeds things up.
- Estimated project value. Some jurisdictions calculate fees based on the value of the work. A fair estimate for a panel replacement plus labor is $1,500–$3,000 for owner-performed work; this affects your fee calculation.
- Proof of ownership. Some jurisdictions require a copy of your deed or tax statement to verify owner-occupancy.
- Owner-builder declaration form. Most states have a standard form; many permit portals include it directly in the application workflow. If yours doesn't, you can usually download it from the building department's forms page.
Use our pre-application checklist to make sure you haven't missed anything before you start.

Step 4: Submit Your Permit Application
The majority of U.S. building departments now accept online permit applications for residential electrical work. Here's how the online process typically works:
- Create an account on your jurisdiction's permit portal (most use platforms like Accela, PermitTRAX, or proprietary systems).
- Select the permit type: "Electrical" and then sub-type "Service/Panel" or "Electrical Panel Replacement." If you don't see a panel-specific option, select "Residential Electrical."
- Enter the project information and upload your documents.
- Complete the owner-builder declaration electronically (most portals accept e-signatures).
- Pay the permit fee online by credit card. Fees range from $50 to $350 depending on your jurisdiction. Print or save your payment confirmation.
- Wait for approval. Simple residential electrical permits are often auto-approved in 24–48 hours in many jurisdictions. Others require a plan review and may take 3–10 business days.
Step 5: Contact Your Utility Company
This step is separate from the permit process but must happen in parallel — don't wait until you have your permit to call your utility. For any panel replacement or service upgrade, your utility company must temporarily disconnect the utility's service wires from your meter to allow safe installation of the new panel. Without this disconnect, you cannot safely or legally install the new panel.
How to do it:
- Find your utility company's name on your electric bill (the company — not the billing address — is what matters).
- Call their residential service line and say: "I need to schedule a temporary service disconnect for an electrical panel replacement at [your address]. I have permit number [your permit number] from [jurisdiction]."
- They will give you a scheduling window. This typically runs 1–3 weeks for non-emergency work. In busy spring and summer months, it can take longer.
- Some utilities have online scheduling portals for this — check their website under "Construction" or "Service Work."
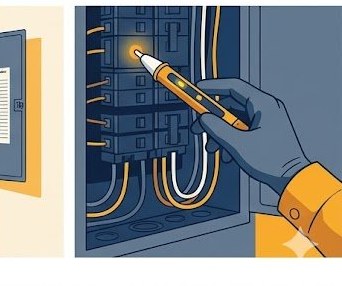
Non-Contact Voltage Tester
Before touching any wiring during a panel replacement, a non-contact voltage tester lets you confirm whether conductors are live without making contact. Inspectors and licensed electricians treat these as mandatory safety tools. The Klein Tools NCVT-3P detects voltage from 12–1000V AC and includes a built-in flashlight — widely considered the best value option for homeowners doing their own panel work.
As an Amazon Associate we earn from qualifying purchases. This does not affect our editorial recommendations.
Step 6: Post the Permit and Complete the Work
Once your permit is approved, print the permit card and post it visibly at the job site — typically on a front window or near the main entry. This is a legal requirement in most jurisdictions and allows the inspector to confirm a valid permit before inspecting.
While performing the work:
- Follow the NEC edition adopted by your jurisdiction (usually 2017, 2020, or 2023 depending on your state and county).
- Do not bury, drywall over, or conceal any electrical work before inspection. Inspectors must be able to see the work.
- Label every circuit on the panel directory before inspection — inspectors commonly cite missing or incomplete labeling.
- Confirm working clearances: 30" wide, 36" deep, 78" high in front of the panel (NEC 110.26).
Step 7: Schedule Your Inspection
After the work is complete, schedule your inspection through the same permit portal or by calling the building department. Most jurisdictions offer scheduling 1–5 business days out. In high-volume urban counties, expect 5–14 days.
What to have ready for the inspection:
- The permit card posted visibly (or the permit number handy)
- Access to the electrical panel — clear the area of obstructions
- The panel interior accessible (dead front cover removed or ready to remove)
- A flashlight (inspectors bring their own but appreciate good lighting)
- Your work notes if the inspector has questions about specific decisions you made
If the inspection passes, the inspector will sign off on the permit. If there are corrections, they'll provide a written list and you'll reschedule after completing them — re-inspections are usually free or low-cost ($25–$50).
Step 8: Receive Certificate of Completion
Once your final inspection passes, your building department will issue a certificate of completion (also called a certificate of compliance or final sign-off). This document:
- Confirms the work was done with a valid permit and passed inspection
- Is part of your home's permanent permit history — accessible to future buyers, title companies, and mortgage lenders
- Is required by many insurance companies when processing claims involving electrical systems
- Should be kept with your home's permanent records (along with the permit and inspection history)
After the certificate is issued, contact your utility company again to schedule the service reconnect. Once reconnected, your job is complete.